Vertical and horizontal frames
The camera that I work with has a 3:2 frame. Freeman notes that this format is overwhelmingly used to take photographs in a horizontal frame. The reasons for this include-
- Ergonomics SLR’s are designed to be used for horizontal pictures, and holding them on their sides for vertical shots is not as comfortable.
- Binocular vision Human vision means we see horizontally and perceive a horizontal picture format as normal.
- 3:2 ratio The 3:2 proportions are often perceived to be too elongated for comfortable portrait composition.
Freeman cautions however that ‘natural’ horizontal framing can also be unremarkable. This next exercise is designed to make me consider the potential advantages in shooting vertically.
Exercise– Using settings and subjects of your choosing, take 20 photographs in a vertical format. Lay out the processed results and consider if the project restrictions encouraged you to search for tall things? Also, note if there was a tendency to place the position of the main weight of the subject low in the frame. Continue the project by shooting a horizontal version of every vertical composition and consider which version is most successful.
I undertook this exercise whilst traveling thus didn’t have the opportunity to revisit the subjects for the horizontal format photographs. I instead took first a vertical photograph and then next a horizontal version of the same subject. I completed the 20 photographs before starting the process of comparing the different frames.
Archways

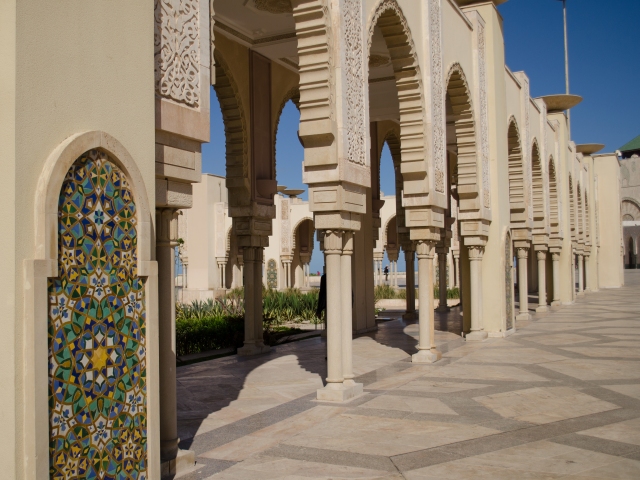
Archways, Hassan II Mosque, Casablanca ISO 100, f/4.2, 26mm, 1/3200s
In ‘Composition’, 2006, Präkel discusses the vertical format and notes it tends to emphasise any vertical line or plane within the image. This seems to be what makes this photograph works well in the vertical version as the height of the columns ‘fit’ the frame.
Archways 2, Hassan II Mosque, Casabanca ISO 100, f/4, 24mm, 1/3200s
This horizontal composition of the same scene also works well. The emphasis is now on the length of the frame and the eye is encouraged to follow the pillars and rhythm of the arches along from left to right.
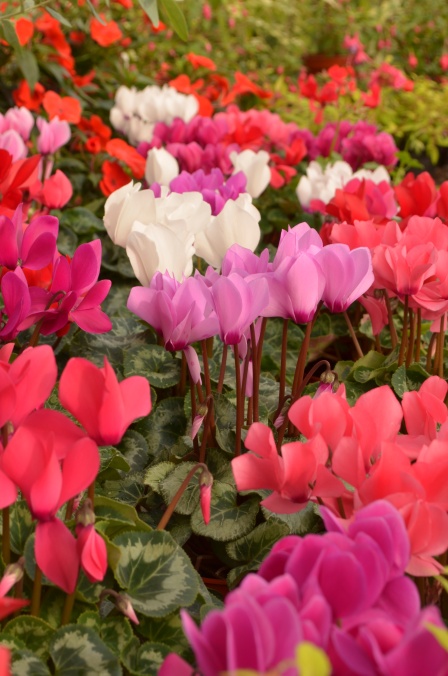
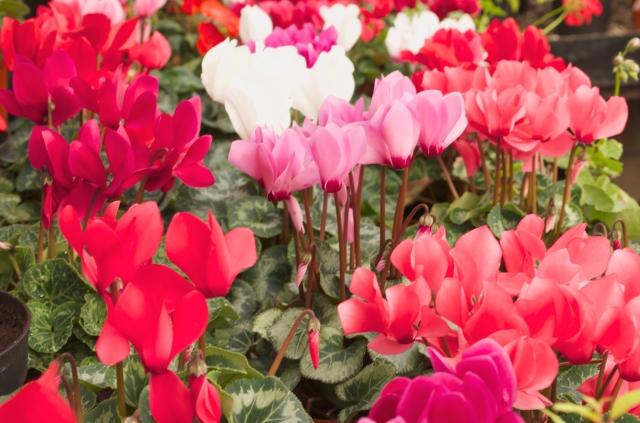
Flowers
Two versions of the same flower display. I consider the vertically shot image to fit more comfortably. Perhaps, due to the fact that the flowers stems mirror the vertical format. The slight blurring in distance adds a sense of depth to the photograph. The horizontal composition is ordinary and predictable.
Flowers 2, 48mm, F/10, 1.20s, ISO 100
Flowers 2, 48mm, F/10, 1.20s, ISO 100
The vertical picture of the statue is static and somewhat unremarkable. There is very little contextual information. However, by placing the vertical statue to one side of a horizontal frame it has become of more interest. The eye is encouraged to move across the frame in search for what the statue may be seeking out.

Statue 1, 38mm, F/8, 1/160s, ISO100

Statue 2, ISO 100, 38mm, f/8, 1/160s
Sign post
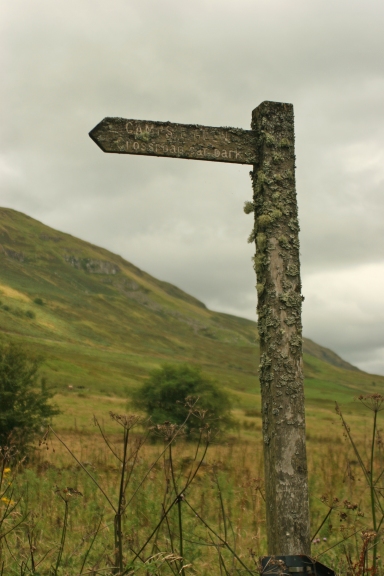
The vertical format used in Campsie Glen 1 has emphasised the diagonal of the hill in the background making it appear steeper, as noted by Präkel (2008). The slight off-centredness allows some space to the left, the direction the sign is pointing towards. In this version the signpost is the main subject. However, somewhat unsurprisingly, the signpost becomes of less importance in the horizontal version, with the main point of attention being the sweeping landscape.
Sign post, ISO 100, 38mm, f/4, 1/640s
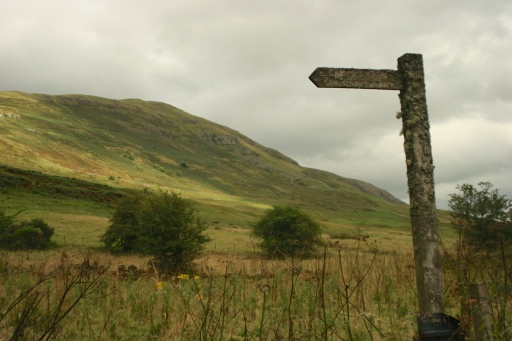
Signpost, ISO 100, 28mm, f/4, 1/800s
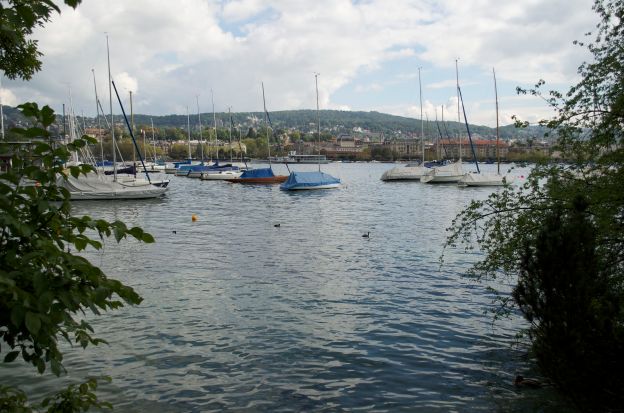
Boats on Lake Zürich
My natural inclination here would be to have mirrored the horizon line of the lake, as in the second shot, and to have taken this photograph horizontally. However, I’m pleasantly surprised at the result of the vertical composition. I think it is the way that the vertical format emphasises the plane of the masts and posts that make this successful.

Boats on Lake Zurich 1, 55mm, F/5.6, 1/400s, ISO 100

Boats on Lake Zürich 2, 55mm, F/5.6, 1/400s, ISO 100
Schoenstatt
Vertically this is a static composition. The height of the building here makes it a good fit for the vertical frame, although there is quite a bit of ’empty’ sky space above. Although still a fairly static composition, I feel the horizontal frame works better as it shows the landscaped garden, which surrounds the building. It also highlights the curve of the path, encouraging the eye to travel along it.

Schoenstatt, ISO 100, 43mm, f/4.5, 1/640s

Schoenstatt, ISO 100, 28mm, f/4, 1/1000s
Kibble Palace
This building is a long and wide structure as can be seen in Kibble Palace 1 below. This would have made me instinctively opt for a horizontal frame. I altered my position and narrowed the point of focus to work within the vertical frame. This shows details on the glass house frame, which were not visible in the first version.
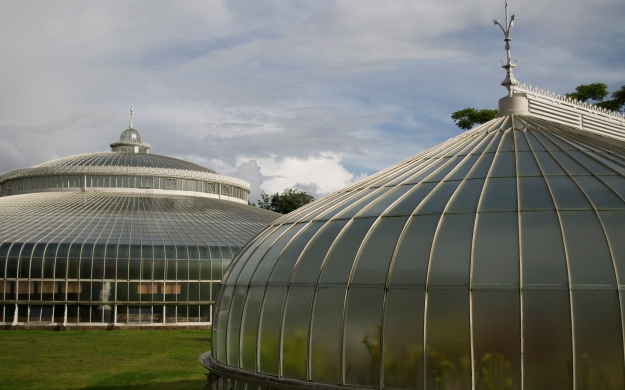
Kibble Palace 1, Botanic Gardens, Glasgow ISO 100, 29mm, f/4.5 1/1600 s
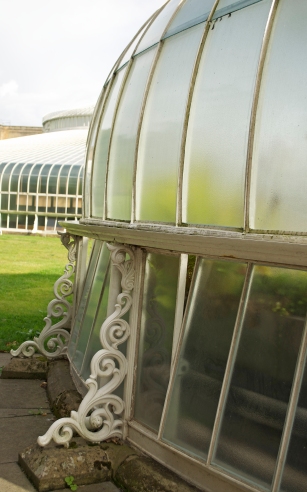
Kibble Place 2, Botanic Gardens, Glasgow ISO 100, 30mm, f4.5 1/320s
View across Lake Como
Both of these shots were taken from the same spot with the horizon point placed around the midway point in the frame. Freeman (2007) discusses ‘aerial perspective’ and how it increases the sense of depth within an image. This is evident in both versions of this scene, as the atmospheric haze has reduced the contrast in the distant parts of the hills. Of the two images, I personally prefer the vertical version. The framing is tighter and has removed the distracting building to the right. The eye is encouraged to move vertically across the lake and hills towards the early morning sky.

View across Lake Como 1, 18mm, F/11, 1/160s, ISO 100

View across Lake Como 2, 18mm, F/11, 1/200s, ISO 100
Balustrade
The subject here has strong vertical and horizontal features, which are complemented by both frame formats. However, I do think the second image may have worked better if I had made the framing tighter to omit the gatepost, which brings the viewer’s eye to a rather abrupt full stop at the edge of the image.

Balustrade 1, 18mm, F/4, 1/40s, ISO 100

Balustrade 2, 18mm, F/4, 1/40s, ISO 100
Funfair
On comparing this pair of images I’m really not sure which one I prefer. The off-centered position of the stall in the vertical version leaves the bears looking off into an empty space, which for me gives the image a sad and lonely effect. Perhaps had I closed in to focus on the bears their vertical stature would have been a better fit to the frame. The horizontal image seems a bit busy with the small toys hanging inside the stall. Perhaps choosing a single focal point may have created a more pleasing outcome.

Funfair 1, 40mm, F/18, 1/20s, ISO 100

Funfair 2, 18mm, F/18, 1/13s, ISO 100
Argegno

Argeno, ISO 100, 34mm, f/10, 1/100s

Argeno, ISO 100, 32m, f/10, 1/100s
Different frame orientation has resulted in quite a marked difference in these images. In the vertical version the eye is drawn along the gentle curve of the riverbed and buildings and climbs to take in the steep diagonal of the hill in the distance. There is a sense of depth and height to the photograph with the houses becoming smaller and fewer. The expanse of trees and greenery add a sense of remoteness.
The horizontal version omits the hill in the background but incorporates buildings to the right. Although only one person is walking in the street the homes, shop and post box all suggest a village setting.
Corniche
The horizontal format shows the length of the corniche, but includes a lot of sky area, which adds very little interest to the image. There was a wall directly in front of where I was standing which prevented me from positioning the horizon line higher. I find the vertical format here more pleasing. I adjusted my position a few degrees to the right and this allowed me to capture more of the sea and the perceived movement of the waves. While the building are too far in the distance for any detail to be captured, the glimpse of the lighthouse adds a little interest.
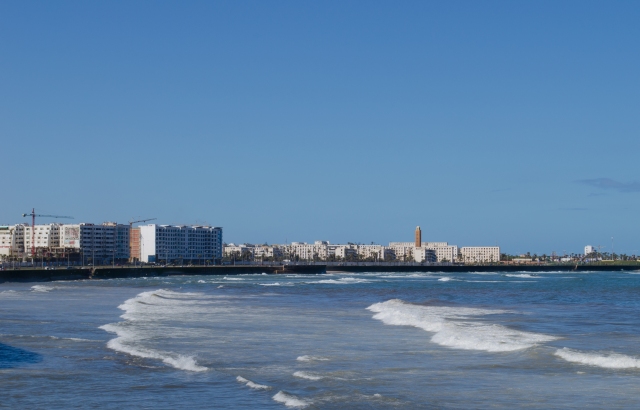
Corniche, Casablanca, ISO 100, 55mm, F/11, 1/400s

Corniche, Casablanca, ISO 100, 55mm, f/11, 1/400s
Morschach
Again, I like both the vertical and horizontal versions of this shot. They both have a sense of depth due to the atmospheric haze, which has reduced the contrast in some areas of the mountains. The vertical frame seems to stress the height of the Alps, while the horizontal shows their extensive length.

Morschach, Switzerland 1, 55mm, F/8, 1/320s, ISO 100

Morschach, Switzerland 2, 55mm, F/8, 1/320s, ISO 100
Lake Zürich
The vertical image here seems to work best as it accentuates the line of the tree trunks and is well-balanced. The horizontal image is weighted heavily to the right with little of interest to the left.

Lake Zürich 1, 55mm, F/5.6, 1/500s, ISO 100

Lake Zürich 2, 55mm, F/5.6, 1/500s, ISO 100
Metal Railings
I think this pair of photographs shows how the vertical format can make diagonals looks steeper and therefore more dramatic. The framing in ‘Metal railings 1’ is tighter, focusing almost entirely on the railings. There is a sense of depth as the railings get smaller and blurrier. The framing in the horizontal version includes plants and parked cars on the street, which I find a little distracting.

Metal railings, ISO 100, 35mm, f/5, 1/80s

Metal railings, ISO 100, 35mm, f/5.1, 1/60s
Torno
These photographs are taken from slightly different positions. This and the different frames have shown the church in quite different ways. The vertical style has shown the church’s position beside a little harbor while the horizontal style shows the church as part of a small village with hills in the background. I think both these frames work quite well for the subject and a preference would be dependent on what context the photographer wanted to show.

- Torno, Lake Como 1, 18mm, F/9, 1/125s, ISO 100

Torno, Lake Como 2, 55mm, F/10, 1.160s, ISO 100
River Limmat
The vertical version in this set of photographs works well as the eye is drawn diagonally across the image. Placing the bridge lower in the frame has helped sub-divide the frame to correspond closely the Golden Section (Freeman, 2007). In the horizontal composition the bridge has been positioned centrally which is a little conventional.

River Limmat, Zurich 1, 55mm, F/5.6, 1/500s, ISO 100

River Limmat 2, 55mm, F/5.6, 1/640s, ISO 100
I’ve already noted that the vertical format tends to stress diagonals within an image. However, the wide-angle lens used and close-up position these photographs were taken from has created strong diagonals here in both vertical and horizontal images. The vertical works well with the tower filling the height of frame and contrasting well with the sky. I, however, prefer the horizontal format as it captures the building as a whole, whilst still contrasting boldly.
Queen Margaret Drive

Queen Margaret Drive 1, 18mm, F/5.6, 1/80s, ISO 100

Queen Margaret Drive 2, 18mm, F/5.6, 1/200s, ISO 100
Moltrasio and High on Moltrasio
Both frame formats seem to work for these photographs. The vertical shots emphasise the steep diagonals of the hills, while the horizontal shots have widened the vistas creating more stable, but equally pleasing images.

Moltrasio 1, 35mm, F/10, 1/124s, ISO 100

Moltrasio, 35mm, F/10, 1/125s, ISO 100

High on Motrasio 1, 24mm, F/18, 1/25s, ISO 100

Lake Como 2, 18mm, F/18, 1/25, ISO 100
I did seem to tend to place my subjects lower in the frame when shooting vertically, such as Shoenstatt, Signpost and Kibble Palace. Freeman, (2007) suggests this may be as it is common to use the bottom of the frame as a base, on which to rest things. He also notes that when working with a 2:3 camera aspect ratio, as I am, the results can often leave the upper part of the picture under-used. An example of this would be the image of Schoenstatt in a vertical format.
I have always considered some subjects to naturally lean towards a vertical format, such as buildings or a horizontal format such as a landscape. However, this task had helped me realise that the majority of subjects I selected for this, or any future exercise, could be shot successfully in either vertical or horizontal format.
Freeman, M. (2007) The Photographer’s Eye. Lewes: ILEX
Präkel, D. (2006) Composition. Lausanne: AVA


