Category Archives: Introduction

Panning with different shutter speeds

The object of this exercise is, again, to photograph movement and note how different shutter speeds affect the results. I will also experiment with a technique known as panning; following a moving subject with the camera and keeping it in the frame. For this exercise I decided to continue photographing the cyclist from the previous exercise in order to directly compare results. My camera was set on a tripod, but with the head loose to allow the camera to swing around.

9. 55mm, F5.6, ISO 100, 1/400s

10. 55mm, F5.6, ISO 100, 1/400s

11. 55mm, F5.6, ISO 100, 1/400.

Images 9, 10 and 11 were taken with a 1/400 s shutter speed. The image is sharply frozen with no sense of movement.

12. 55mm, F8, ISO 100, 1/200s

13. 55mm, F8, ISO 100, 1/200s

14. 55mm, F5.6, ISO 100, 1/200s

Images 12, 13 and 14 were shot with a 1/200s shutter speed. Again, the subject is sharply focused. However there is a slight sense of blurring in the background.

15. 55mm, F8, ISO 100, 1/100s

16. 55mm, F9, ISO 100, 1/100s

17. 55mm, F10, ISO 100, 1/100s

With the camera set to 1/100s shutter speed there is a little motion blur with both the subject and background, although this may also be a result of my still developing panning skills.

18. 55mm, F11, ISO 100, 1/60s

19. 55mm, F11. ISO 100, 1/60

20. 55mm, F13, ISO 13, 1/60s

Images 18, 19 and 20 were taken with a 1/60s shutter speed. This shutter speed seems to capture the subject fairly sharply while allowing the background to become streaked. This gives the impression of movement. I think image 19 is a particularly good example of this.

21. 55mm, F16, ISO 100, 1/25s

21. 55mm, F16, ISO 100, 1/25s

At a 1/25 s shutter speed both the subject and background have become blurred.  This further increased as I reduced the shutter speed to 1/10s,  as seen below.

22. 55mm, F29, ISO 100, 1/10s

The motion blur in this photograph conveys the the idea of movement and speed.

I compared the images 1-8 from the shutter speed series with the panning series images 9-22 to select the photograph that I like most.  The images taken with a fast shutter speed, such as 1/400s, resulted in sharp photographs with the cyclist and the location identifiable. However, they did not show movement.

The photographs with some degree of motion blur seemed to appeal to me more. However, image 22, which has both foreground and background blurring, made me think of not only the cyclist racing by, but also the world rushing past.

The image that I preferred was image 7 from the Shutter speeds exercise.

7. 55mm, F22, ISO 100, 1/20s  

The 1/20s shutter speed has captured the movement of both the bicycle and cyclist while the buildings in the distance remain fairly sharp. This shows both motion and speed in the photograph subject.

This exercise has shown me the effect that differing shutter speeds and panning can have in photographing movement. I also found that panning was more difficult that I initially realised as noted by the slight blur in images 15, 16 and 17 take with a 1/100 s shutter speed.


Photographing movement-shutter speeds

The aim of this exercise was to use my camera’s shutter speeds to photograph movement. This required a subject (rather unsurprisingly) that moves. I chose to photograph someone riding a bike at a beach side setting. While the background does contain a few structures in the distance I still consider it simple enough not to detract from the subject of the photograph.

I set the camera on a  tripod and took a series of shots, adjusting the shutter speed each time, as the bicycle rider cycled back and forth. I selected Shutter priority on my camera to ensure that the camera would select a suitable aperture for each shot.

I started with a shutter speed of 1/400.

1. 55mm, F5.6, ISO 100 1/400

At this shutter speed there is little sense of movement. Each spoke in the bicycle wheel is visible and the cyclist appears static.

2. 55mm, F9, ISO 100, 1/200

With the shutter speed set to 1/200 there is no immediate sense of movement in the photograph. Again, the spokes in the wheels of the bicycle are visible. However, when you look closely there is a a little blurring around the cyclist’s foot as he pedals. This was the slowest shutter speed I used which rendered the subject relatively sharp.

As the shutter speed gets slower there is some very obvious blurring both with the cyclist and bicycle.

3. 55mm, F11, ISO 100, 1/125

4. 55mm, F14, ISO 100, 1/80

5. 55mm, F16, ISO 100, 1/60

6. 55mm, F20, ISO 100, 1/40

The blurring increased as I slowed the shutter speed down from 1/125 to 1/80, then from 1/60 to 1/40 of a second. However, the back ground in each image has still remained fairly sharp.

7. 55mm, F22, ISO 100, 1/20

In this image the 1/20 s shutter speed has recorded motion blur with both the bicycle and the rider. It gives the impression of movement and speed.

8. 55mm, F32, ISO 100, 1/15

The image taken with a 1/15 s shutter speed has recorded the subject with a high degree of motion blur. While this image does relay the idea of movement it also appears somewhat abstract.

Using a slower shutter speed was effective in producing images with motion blur which I believe gives the impressions of movement and speed.

I will continue to experiment with shutter speeds in the next exercise.  I will also continue to photograph the cyclist at the beach side setting while panning with different shutter speeds.

Focus at different apertures

This exercise aims to demonstrate the way that aperture can affect the focus in a shot. For this exercise I chose to photograph coloured pencils from a very low angle. I set the camera on a tripod and focused on the orange pencil in the centre of the image.

18mm, F3.5, ISO 800

I set the camera to Aperture priority, allowing the shutter speed to be automatically selected by the camera, and  took the first picture.  I set the lens to it’s widest available aperture, F3.5.

18mm, F11, ISO 800

I took the second photograph with the lens set to F11.

18mm, F22, ISO 800

The photograph was taken with a small aperture of F22.

I then printed the photographs and compared them. There was a noted difference in the limits of sharpness between each.

In image 1  the yellow, red and orange pencils are the only items which are sharp, with the pencils further back becoming increasingly blurred.

In photograph 2 the limits of sharpness become a little wider. The first 6 pencils are sharply focused with even the text printed on the navy blue pencil becoming clearer.

The third photograph has an even wider area of sharpness with more detail becoming noticeable such as the grain in the wood of the table and the text printed in the rear pencils.

I found the difference between these 3 images quite remarkable. I personally liked photograph 1 the most. I liked the blurring of the pencils and colours at the end of the row as it conveyed a sense of distance.

Focus with a set aperture

This activity looks at focus. It requires me to select a scene which has depth of field and then, with the camera set to it’s lowest f-stop, take 2-3 photographs while focusing on different points in the distance within the shot.

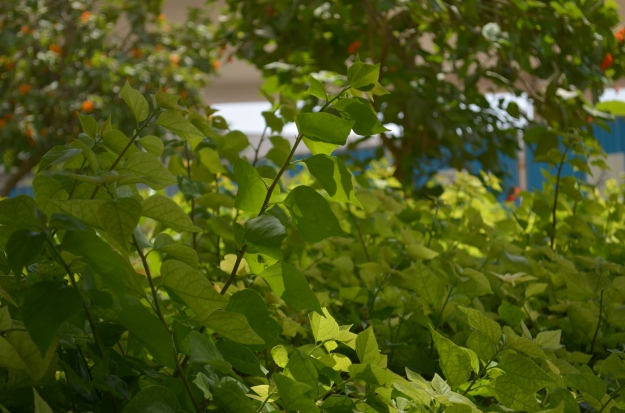
I selected a park scene, looking across some shrubbery and trees.

1.DSC_0024

55mm F5.6 ISO 100

In photograph 1 I placed the focus at a point a 1/4 of the way in from the left. This has put the plants in the foreground of the shot in focus, allowing the details in the leaves to be clear and the plant stems to be well defined. The trees and plants to the right and in at the back of the image are blurred.

2.

DSC_0028

In this second photograph I focused on the centre of the image. This has allowed the centre stem to become a focal point. This draws the eye to the fine detailing in the leaves and their translucent qualities. There is still a feeling of distance to the shot as the trees and fencing to the rear are blurred.

3.

DSC_0026

55mm F5.6 ISO100

For the third photograph I aimed the focus 3/4 of the way across from the left. This brought the tree more into focus and caused the plants at the forefront to become blurred.

This exercise has shown how the focal point in an image can draw the viewers eye and how a sharp object can really stand out against an out-of-focus background.

While there appears to only a little difference between images 1 and 2 I prefer image 2. My eye was drawn immediately to the almost centre stem of leaves. The central focal point here allowed the detail to be sharp against the out-of-focus surroundings. The image also retained it’s sense of depth.

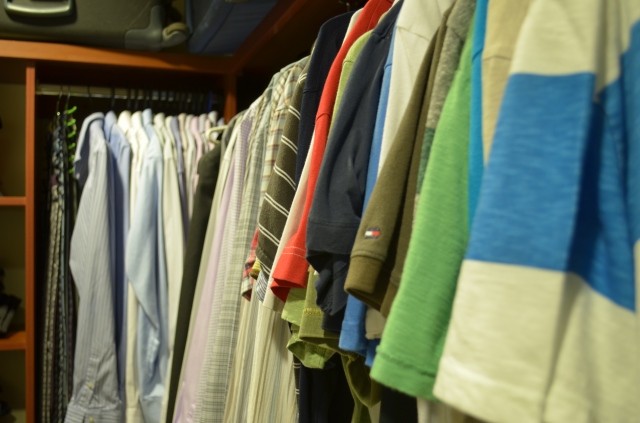
I decided to repeat this exercise, this time using a more man-made subject, a wardrobe full of clothes. I chose this subject as the colours and patterns made the focal points easier to see.

1.focus right, 26mm, F4.2, ISO200mm

26mm, F4.2, ISO 200

In this image I placed the focal point to the far right of the shot which shows the garments hanging here clearly. The eye is drawn in particular to the blue and white striped shirt which is sharply in focus.

2.

focus centre, 26mm, F4.2, ISO 200

26mm, F4.2, ISO 200

The central focal point in this shot shows the brown and white stripes shirt very clearly against the out-of-foucussed garments in the forefront and background.

3.

focus left, 26mm, F4.2, ISO 20026mm, F4.2, ISO 200

The left focal point sharpens the view of the formal shirts hanging to the rear of the image. This allows the thin stripes on the sleeves to become clear for the first time.

This exercise has shown me the value in varying focal point within an image and the way in which a sharp image can really stand out amidst out-of-focus surroundings.

Getting to know your camera- Focal Length and Angle of View

Having read the information in the OCA manual on how lenses in digital cameras vary from, what was previously, the norm of 35mm I looked in the Nikon manual for the specification for my camera. It notes that the a 35mm lens is typically 36 x 24mm but the D5100 is 23.6 x 15.6mm. It also told me that to convert the focal length of photographs taken with my Nikon to 35mm I should multiply the focal length by 1.5.

I carried out the exercise describe in the manual with a Nikon 5100 and 2 lenses:

a 18-55mm and a 70-300mm zoom lens.

I took my first photograph with the lens focused to 55mm as this brought the object to roughly the same size within the viewfinder as they actually were.

DSC_0064_01

55mm

The second photograph was shot with lens set to 18mm as this is the smallest lens range I have at present.

18mm, f/5.6, 1/3s, ISO 200

18mm

The third photograph was taken using my zoom lens with the focal length set to 300mm. For this shot I had to move my camera further back from the point where I had taken the first 2 shots as at this point the shot was out of focus.

300mm

300mm

I then printed them off on A4 paper. Beginning with the first photograph I held the photograph in front of me and found that when I held it arms length, roughly 60cm, it appeared to be of the same size.

With the wider angle shot, I had to hold the photograph just a few cm in front of my eyes to make it the same size as the original, not a pleasant way to view a photograph.

As I explained previously, to photograph the shot at my widest focal point, 300mm, I had to reposition the camera and also persevere for some time with the focus to capture the shot. I had to walk backwards, away from the photograph to point almost 7.5 m away! Again, not a particularly pleasant way to view a photograph.

This exercise did illustrate to me the concept of  ‘a comfortable viewing distance’. It was also helpful as it allowed me practical experience with working with my newly acquired camera and lenses.

Introduction- Getting to Know your Camera.

I have read the first few pages of TAOP student manual and following it’s advice began to read my camera manual. As I have recently changed cameras I found it be an extremely useful exercise. I previously had been using a Panasonic Lumix FZ45 and now have a Nikon 5100. My Panasonic had been used, basically,  as a point and shoot camera up until a few months ago so the idea of working with interchangeable lenses was rather daunting. I worked through the Nikon’s manual, trying out each instruction and setting. On first read the main point I had trouble getting my head around was the Focus settings as they stated which situations each would be suitable for but then followed on with a list of exceptions to these which I found contradictory. I made note to revisit the Focus settings and hope that more practical experience with the camera will make it clearer. I also made a brief note to experiment with the Interval Time Photography and Self Timer settings. I have downloaded the manual onto my IPad so that I have it handy for further reference.