Category Archives: 09. Points

Exercise- Multiple Points

Set up a still-life with 6-10 similarly sized objects, each compact in shape. The background should be unfussy but not entirely plain. Add one object to the arrangement at a time, recording each position with the camera. The aim is to produce a final grouping, which is not so obvious as to appear boring, but hangs together visually.

In the previous exercise I looked at positioning a single point in the frame. By introducing more points into the frame, imaginary optical lines connecting the points are created. These imaginary lines can also create implied shapes.

I decided quite quickly to use earrings and other small jewellery beads as the ‘points ‘ for this exercise. Deciding on the background and arrangement took much more time. I found out as Freeman (2007) states that when positioning several objects the order and placement can be very demanding. I rearranged the still-life and points many times before I decided upon the composition below. I fixed the camera onto a tripod and pointed it down to face the tabletop.

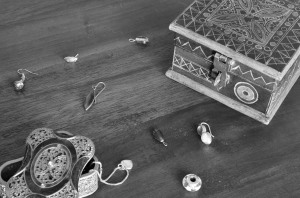
I arranged two small jewellery boxes to add some context to photograph. I positioned the boxes at opposite diagonal corners with a small pendant spilling from one. This was to be my initial point. It wasn’t until later that I realised that the placement of the boxes had created an implied diagonal across the frame.

1 point

1 point

I then began to add additional points, one at a time. I was aware at the time that I wanted to create an arrangement that suggested the pieces of jewellery had spilled over from the boxes but I consciously avoided placing the points too close together as I wanted the details in each piece to still be seen.

2 points

2 points

3 points

3 points

I was aware at this stage that the point had formed a line, so I placed the fourth point in the, as yet empty, space in front of the large box. I didn’t realise until I looked at the photographs later that this had created a triangle.

DSC_0164 copy

4 points

4 points

5 points

DSC_0168 copy

6 points

At this step positioning the points required quite a lot of thought and I tried several different options before selecting this arrangement for points 7 and 8.

DSC_0169 copy

7 points

DSC_0171 copy

8 points

On studying the final photograph, I noted several ‘lines’ and ‘shapes’ that the points had created. More than I was aware of while positioning the points and taking the photographs.

Screen Shot 2012-12-17 at 11.09.41 AM

First viewing

On first viewing I noticed that 2 strong triangle shapes had emerged. Interestingly, one of the triangle sides is created by an implied line from the pendant to the hasp on the larger jewellery box, which I hadn’t considered to be a point while arranging the composition.

Screen Shot 2012-12-17 at 11.06.40 AM

second viewing

On further reflection I also noticed that I had unconsciously continued the diagonal line created by the larger box (see yellow line). This seems to have acted lie a boundary line, as I haven’t placed and points beyond it. Similarly with the red line, which reaches from the hasp towards the earring and bead. In between these 2 lines a triangle has been formed.

While working on this exercise I read the discussion by Freeman (2007) on Gestalt laws of organisation and found it useful in understanding the way that graphic elements in photographs, such as points, are interpreted by viewers. In particular, I could see where the Law of Closure- elements roughly grouped together are seen to complete an outline shape and the Law of Simplicity-the mind lean towards visual explanations that are simple; simple lines, curves and shapes are preferred, along with symmetry and balance have been applied as I carried out this exercise.

This exercise has been valuable, as it has shown me that it is difficult to achieve a natural looking still-life composition. However, being aware of the perceived lines that assembled objects create will help me in creating cohesive arrangements.

Freeman, M. (2007) The Photographer’s Eye. Lewes: ILEX

Präkel, D. (2006) Composition. Lausanne: AVA

Exercise- Positioning a point

This is the first exercise in the section Elements of Design. The course notes suggest that working in black-and-white offers an advantage of focusing attention more precisely on the graphic element in a photograph.

Take three photographs in which there is a single point, placed in a different part of the frame in each example. Explain your decisions.

 The point is the most basic graphic element of all. For a subject to be considered eligible as a point it should contain only a small part of the frame area and contrast, in some way, with the background.

Freeman (2007) suggests that, practically, there are three zones in a picture frame for placing a single, dominant point with three differing readings

  • central- static, and usually dull
  • close to the edge- markedly eccentric, needing some justification.
  • slightly off-centre- moderately dynamic, without being too extreme

In preparing for this exercise I looked through my photograph library to search for examples where I had composed an image around a point. I found it helpful when doing this to consider the expanded the definition of a point, suggested by Präkel (2006), as a small area of concentrated detail. Even so, I found only a few photographs that could be considered a point.

Gull

Gull

Screen Shot 2012-12-13 at 4.34.09 PM

The gull is positioned central in the frame. The composition is simple and uninteresting.

Screen Shot 2012-12-13 at 4.40.33 PM

Screen Shot 2012-12-13 at 4.40.16 PM

The speedboat in this image is, again, centrally positioned. I feel the composition would have appeared less static had a positioned the boat slightly off-centre, either to the right or left.

Screen Shot 2012-12-13 at 4.37.22 PM

Screen Shot 2012-12-13 at 4.34.53 PM

This  desert rose flower fell from the tree above onto the top of a hedge. I positioned the flower slightly off-centre to the right. The ray of sunlight shining into the frame and on to the flower, from the top right hand corner helps justify the placement.

To demonstrate three different positions in which you can place a single point in the frame I chose to photograph a Black-winged Stilt, which I spotted wading in a man-made lake, in a busy part of the city.  I took the three photographs of the Black-winged Stilt in colour and then later converted them to monochrome

The first photograph has the bird placed centrally in the frame.

DSC_0114 copy

1. Black-winged Stilt
180mm, f/10, 1/200s, ISO 100

Screen Shot 2012-12-13 at 5.02.42 PM

The composition is static, with no sense of movement or activity.

For the second photograph I captured the bird slightly off-centre.

DSC_0116 copy

2. Black-winged Stilt
180mm, f/10, 1/200s, ISO 100

Screen Shot 2012-12-13 at 5.01.45 PM

The dividing lines show how the point has divided the frame. The horizontal line mirrors the direction the bird has taken as it wades through the water looking for food. This, teamed with the bird’s actions has added slightly more dynamism to the composition.

Präkel (2006) notes that the message conveyed by a single point is usually one of overwhelming isolation. I found that my eye seem to follow the direction pointed to by the bird’s tail feathers, towards an area of empty water. This empty, undisturbed water does seem to add an air of isolation and calm to this composition.

DSC_0115 copy

3.Black-winged Stilt
180mm, F/10, 1/200s, ISO 100

Screen Shot 2012-12-13 at 4.59.49 PM

This image is my favourite of the three. It shows the bird placed low in the frame, towards the bottom right hand corner. Freeman (2007) describes placement such as this to be ‘markedly eccentric’ and requiring ‘some justification’.

By using the point as a marker to divide the frame I noted that the division was close to the Golden Section ratios.  Placing the bird closer the bottom of the frame has also made the bird appear closer to the viewer. The ‘empty’ space, in the upper part of the frame, contributes a sense of calm and quiet to the photograph.

This exercise has been useful as it demonstrated to me that, in this series of three photographs, the centrally positioned point was the least successful.

I took the three photographs of the Black-winged Stilt in colour and then later converted them to monochrome

Freeman, M. (2007) The Photographer’s Eye. Lewes: ILEX

Präkel, D. (2006) Composition. Lausanne, AVA Publishing SA